Monday, September 2, 2019

Roasted Herb and Tomato Caprese

Roasted Herb and Tomato Caprese Salad


Next level Caprese salad.  I know that at the end of summer the tomatoes are sweet and tasty as is.  I roasted some Roma tomatoes  to make them even better.  They are perfect for this salad.


The tomatoes roast low and slow for four hours in olive oil, garlic, fresh rosemary and oregano.

First get your tomatoes and cut them lengthwise into quarters.

Throw them on a parchment lined sheet.


Add the herbs oil and garlic and toss them well.

Roast - for a long time

Keep and eye on the garlic cloves during the roasting.


If the garlic cloves are cooked, take them out. When garlic overcooks it tends to taste bitter

 Save that oil for the salad


Roasted Herb and Tomato Caprese Salad
2 side servings (5 hours)

Roasted Herbs and Tomatoes
6-8  Roma tomatoes
4-5  tablespoons of EVOO
6-8  Garlic cloves, separated but not peeled
3     sprigs of fresh rosemary cut into smaller sprigs
4     branches of fresh oregano
       Salt and pepper

Salad
4    Balls of Bocconcini Cheese cut into bite sized pieces or smaller bocconcini
1    tablespoon fresh basil - or more to taste, chopped well
      Balsamic vinegar or balsamic glaze
      Salt and Pepper

Directions
  1. Set oven to 225F.  Line a baking sheet with parchment paper.  Cut tomatoes into quarters.  Place tomatoes, garlic, herbs on sheet.  Generously drizzle olive oil over the mixture.  Toss the mixture by hand to make sure that all the herbs and tomatoes are covered.  Roast for 4 hours.  Check the garlic regularly after an hour.  If the garlic is cooked remove it.  Toss the  mixture every hour or so. 
  2. After four hours remove from the oven and let rest.
  3. To prepare the salad cut the tomatoes into bite sized pieces and add to a bowl.  Add the cheese.
  4. Crumble some of the roasted herbs onto the salad.
  5. Add the chopped basil.
  6. Pour any oil from the parchment paper into the salad.  Salt and pepper to your liking.  Toss all ingredients together.
  7. Drizzle with your favourite balsamic. Serve.

This recipe is forgiving and you really don’t need to measure things.  Go by personal tastes.  Maybe you like more bocconcini.  You can certainly scale this recipe up to feed more people.  


Sunday, April 21, 2019

Dark Chocolate Macaroons with Hemp Hearts

So good and healthy, too.

Feel free to add more sugar to your liking.


I will not fill up this post with text that will slow you down from making these immediately.

All you need to know is that they are gluten free, filled with antioxidants from the chocolate and they include super food “Hemp Hearts”.  Hemp hearts have protein, Omega 3&6.  And the ones I used are made in Canada.  Manitobaharvest.com.  #manitobaharvest

Grab the ingredients and make these ASAP.

Ingredients

2 2/3 c   Medium shredded coconut, unsweetened
1/2 c      Mini chocolate chips semi-sweet
1/4 c      Cocoa powder
Pinch     Salt
1/2 tsp   vanilla extract
1/3 c.     Sugar
2            Egg whites
1/4 c.     Shelled hemp seeds (Hemp Hearts)


  1. Preheat oven to 325F
  2. Melt chocolate chips over double boiler or in microwave,  high power for 20 second intervals, stirring in between.
  3. Mix all ingredients in a bowl
  4. Using a cookie scoop to form cookies place on a silpat lined baking sheet (Or Parchment Paper) about an inch apart
  5. Bake for 15-18 minutes
  6. Enjoy

Lori

Sunday, November 2, 2014

Bloody..... Cupcakes

Hi...

I wanted to share this little indulgence in the kitchen with you.  It was for a Halloween  bake-off. I didn't win the contest, however, I don't think any of the other contestants had as much fun as I did preparing their entries.

This idea comes from Easy Baked.

I used a different recipe for the cupcakes and icing but Easy Baked glass and blood are PERFECT.

This is the glass, cooling on parchment paper.  I wasn't happy with my first batch and redid it.

I found that spraying the parchment left a bit of a residue on the glass candy. My second batch was much better. I let it harden on a silicone sheet.  When done I used the heel of a kitchen knife to shatter the glass.


I couldn't resist taking this picture. No one was hurt.  It is delicious though.


Red velvet cupcakes are sooooo pretty.


Here is my display.  I made the skulls using easy melts and a mould.


Sunday, May 4, 2014

My Own Version of Presidents Choice Recipe


Here is a link to the original recipe.

http://www.presidentschoice.ca/en_CA/recipes/recipeslisting/lemon-infused-mushroom-triangoli-with-parmigiano.html

Here is my version...

1 pkg  PC Black Label Triangoli Porcini Mushroom with Truffle filled egg pasta
1 cup  pine nuts
2tbsp  EVOO
1tbsp  butter
Zest of one large lemon
3 cloves garlic - finely chopped
Fresh chives (amount to taste)
Freshly grated Parmigiano Reggiano cheese (the real stuff only please)


Cook Triangoli pasta according to directions on package.

While pasta is cooking toast pine nuts in a dry pan. Remove from pan and set aside.


Heat olive oil and butter in warm pan. Add chopped garlic, slowly and lightly sauté until translucent, about 5 min.


Add lemon zest, pine nuts, chopped chives, and cooked, drained pasta to pan. Remove from heat and add parmiggiano cheese.  Salt and pepper if desired.


Friday, April 18, 2014

Fun, Beautiful Dessert

What you need

One package of Chocolate wafers
Whipping cream
Sugar
Vanilla
Raspberries
Kahlua or other liqueur for flavouring (optional)

Whip up some fresh whipping cream, sweetened to your liking, add a dash of vanilla and if desired add something special, like kahlua or triple sec, etc....  Optional.  For my first attempt I used only vanilla extract.


Spread a layer of whipped cream on the chocolate wafers.


Slip in some berries on one of the layers.  Now you stack the layers on top of each other. Only one of the layers will have berries.


It doesn't matter where the layer of berries is, but the cake is a little less tippy if the berries are not in the bottom layers.


I made five layers of wafers and cream, put the berries in the middle layer and one plain layer on top. You can do more or less if you wish....


Now, use whipped cream to ice it like a layer cake.


Let them set up in the fridge for at least two hours, the cookies will soften and have a cake like texture. So pretty, so fun....


I grated some dark chocolate on them and dropped a few berries on the plate.


Sunday, July 7, 2013

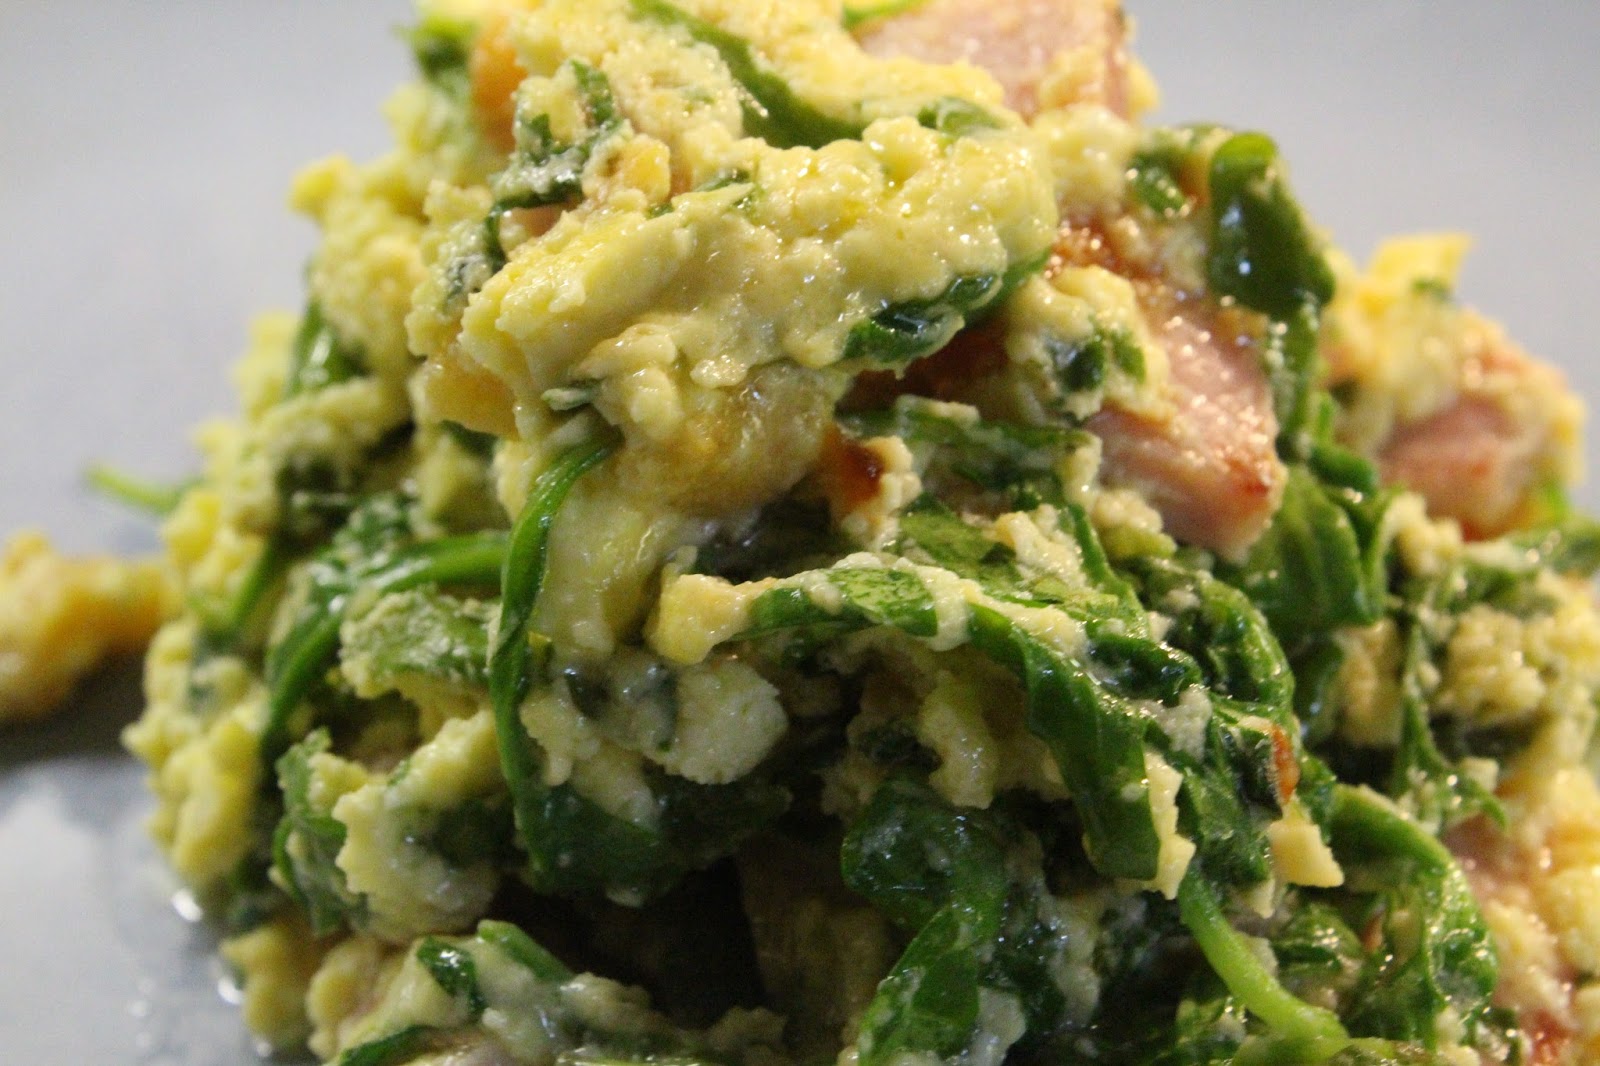
Green Eggs and Ham

This is my version of Green Eggs and Ham. Great for company and can be easily doubled or tripled.

I've followed a recipe for this dish for some time but this morning I had left over mascarpone and was determined to incorporate it into breakfast. This recipe also includes fresh basil from my herb garden and baby arugula to add more flavour and texture.   Can be easily doubled or tripled. 


Recipe

2 tbsp olive oil
2 cloves of garlic - finely chopped
4-6 slices of Canadian Bacon or Peameal Bacon
2/3cup Mascarpone Cheese (or cream cheese softened with milk)
4 large eggs
1/4 to 1/2 cup chopped fresh basil (more if desired)
2 cups baby arugula
1/4 cup parmesean cheese

Heat frying pan over medium heat add olive oil. Cut bacon into 1 inch squares. Add bacon pieces and garlic to frying pan and cook over medium to med/low heat until garlic is soft, approx 7-8 minutes.  While bacon and garlic are cooking beat eggs, add chopped fresh basil.

 Increase heat to medium.  Add mascarpone to the pan to melt and stir, about one to two minutes.  Add Arugula and stir to wilt, about one minute. Add eggs and stir as you would to make scrambled eggs.  Continue cooking eggs slowly over medium heat until desired doneness.  I prefer my eggs a little on the moist side. I find that if they get cooked too much they become rubbery and runny.  I don't like that.  When they are cooked to your liking turn of the heat and stir in the parmesean cheese.  Serve with toast and coffee or tea, a nice fruit salad and, of course, mimosa!!

I have often made a large batch and placed the eggs in a large dish to serve a group of people at brunch.  Because the ham/bacon is in the eggs you have a one dish main that looks and tastes great.

L


Saturday, May 4, 2013

Chocolate Turtle Cookies

These have got to be my new favourite cookie. I think they will be for a long time. I mean, how can you outdo the combination of rich chocolate, toasty pecans and smooth buttery caramel.  How?

I found this recipe at Pixelated Crumb.  It is an America's Test Kitchen Recipe and really worth making.  I was on Pixelated Crumb recently to recreate those fabulous Garlic Oven Fries this past weekend and I came across their top recipes of 2012.  This one is #1 so, duh, had to try it...

The dough is sticky so it needs to be kept cool for best results.
Here is it after chilling for an hour in the fridge. That chocolate looks so rich.


In some of the reviews I read that it was important to keep the dough chilled before cooking so after initially forming the cooking balls I put the tray in the fridge to keep that butter solid and help the cookie hold its shape

After rolling them in the eggwhite and pecans I formed the caramel cup.


After baking they puff in the cup a bit and need to be pressed again. Do this right away and if the cookie cracks it is really easy to squeeze it back together when they are very warm from the oven

Now they are ready for the caramel jewels.

They are so good and despite the caramel filled cup they are not overly sweet.

Try them, let me know how yours turn out.


Thursday, May 2, 2013

Cake Disaster

To celebrate Valentines Day with the BF, I made a diabetic friendly cake. Twice. It was awful.  Both times.  As a twitter follower of +Epicurious I was eager to submit my experience in response to a call for such dilemmas to @AskKemp.

I was really excited when she responded.  After a few back and forth tweets about the details of the recipe, including a tweet of a picture of the recipe, she replied that she was working on determining the problem and to my total delight - Fixing it!  AND that she wanted to include it in her next column post.

What an honour! She wanted to know if I would be patient! and wait.  Of course I would.  Not only was I excited that she would have a solution, I was beginning to believe that the recipe was flawed and its awfulness was not my doing.  Phew!

I was thrilled when I read this tweet.  As soon as I got home I checked out her post.

She made the original recipe, included a picture and posted the new and improved recipe in her post.  The original recipe turned out exactly like mine. But the new and improved recipe....  Wow! What a gorgeous looking cake.  I don't think I can post a copy of the photo but encourage you to go and take a look at the post.  The details about why the recipe didn't work are pretty impressive.

The new and improved recipe is now available under the member recipes on Epicurious.

I hope to try it out very soon!!  I will post my results. If you try this recipe please let me know how it works out for you!

Oh...  and Thank you so much, Kemp!!!

Lori


Thursday, April 25, 2013

Mounting a Map Poster as Art

Coming soon...

Map Art Project

I have a large map almost 3 feet by 4 feet and a smaller one, just under 2 ft x 3 ft that I found on Wikimedia Commons.

Did you know that there are tons of copyright-free images there?

I found a really seventeenth century map of the region of Italy where my family comes from and an eighteenth century map of the region where my boyfriend comes from.  I am in the process of mounting the smaller map on foam board this week so that I can hang it on the wall.  I will update the website as the project progresses.  When I have successfully completed the project I will move on to the larger map and post some photos.